subscribe via rss e-mail me facebook pinterest home Image Map
Showing posts with label my quilts. Show all posts

March 27, 2014

Name That Quilt ~ Backing

So, I may have forgotten the post on how to sew the backing (*red face*). For some reason I thought I had posted it, somewhere; ... But looking back, that is clearly not the case. Good thing I've got a sister who is more on top of it than me!

The backing is pretty simple, and goes the same way for either the Lap or Twin size.

Fold fabric in half, length wise, marking the center.


Unfold and cut along fold line.


Trim selvedges. With right sides facing, sew together along selvedge ends


Press seams, and you're done! Easy Peasy! 

If you'd like to share your finished Name That Quilt, you can send any photos to admin@fabricseeds.com, and I will spotlight your quilt!


November 4, 2013

Heart+ {a delivery}


I visited my Grandmother a few days ago to take her new quilt to her.
I had hoped to get a picture of her with her quilt, but funny thing about my Grandma. She will take all the embarrassing pictures of the family as she can get, but when it comes to any sort of picture of her, she hides.
This time was no different. Out of respect, and all those embarrassing pictures she may have on me, I decided not to post it.


Although my Grandmother is a quilter herself, I did not learn the craft from her. In truth, though I knew she made quilts as I was growing up, I can't say that I knew she quilted them. We borrowed her frames frequently for tie-ing quilts, and that's kinda all I knew. 

She didn't just do the quilting by hand either, but much of the piecing too. My grandparents used to travel the road quite a bit, and during their road trips, Grandma would piece blocks or knit. 

She may not have been the one to teach me about quilting, but she has been the one who inspired me to be better at it. I started as a hand quilter. I'm glad I did. However, I went into it blindly. All I had ever done was tie a quilt. My stitches were horrible. I'm okay with that. In fact, I'm proud of that! That first quilt lays on my bed, falling apart. But the stitches are still there. It's pretty nostalgic to look back at where I started and see now where I am. I believe my art has became better, because I had that push from my Grandma to be better.

As with any, I could only hope that she would love this quilt. When I handed her the quilt, she could hardly believe the size of it (measuring 54"x72"), that it was a 'real' quilt.

She barely unwrapped it all the way before she was cuddling up underneath.

I'll take that as the biggest compliment that could received.


October 29, 2013

Heart+

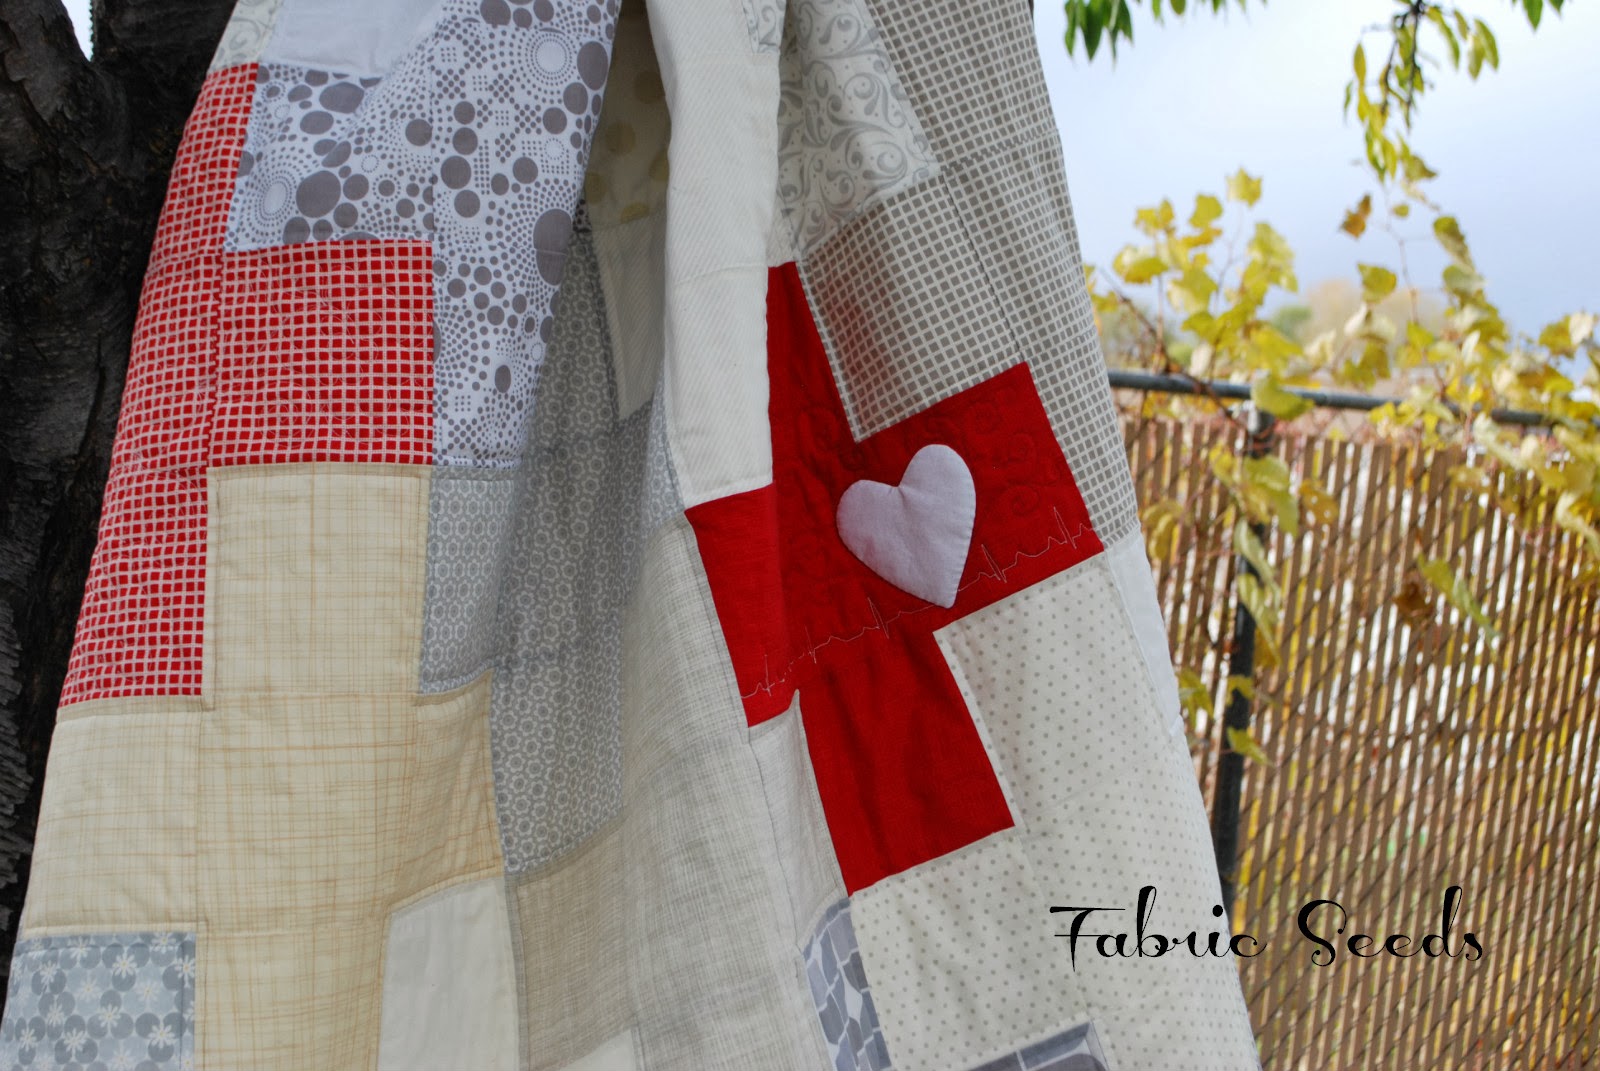
I have had this idea for a quilt for a few months now. I am both happy and sad that I was able to make it. I made it for my Grandmother, who has been hospitalized a number of times for heart complications. Most recently was just last year, with multiple visits to the hospital and the threat of another surgery. It was after that time that I thought I should make her a 'hospital' quilt, for the next time she might find herself there. Of course the only pattern that came to mind is the plus sign.


But it's not just the plus sign. It's the symbol of hope. Imprinted throughout medical history as the place to go for help, nurturing, comfort and care. So, this is my contribution to the plus quilt, the red plus with a white heart and a healthy e.c.g. running through.


I made this for my Grandmother.
Luckily not because of her heart.
Unfortunately because she did have an unexpected surgery this past weekend,
to pin and screw 4 broken toes.  

It's a quilt I secretly hoped I would never have to make.
Now that it is made, I love it.


I didn't want to take away from the simplicity or cuddle-ablity of the quilt. I echoed the blocks, 1/4" from the edge. Except for the red ones. If you look closely, you can see the texture in the picture below.


I used 4 colors of thread, wanting to match the grays, tans and whites of the blocks, and the one red block. Giving the heart applique a little something extra. I love how it turned out. I love that it stands out on the back.


I don't usually label my quilts. In fact, my first label ever was for the quilt I made my Grandpa for his birthday. Here is the label I made for this quilt.


And a few extra shots of the quilt .... 


I am linking up to the Bloggers Quilt Festival.

AmysCreativeSide

This is my first year joining the festival, and really, it was all by chance.
I was browsing through the catergories today, and there are some amazing quilts entered. If you haven't already, take a few minutes (or an hour or two) to check out what some other seriously talented quilters have put together. You won't be disappointed.


September 30, 2013

Cuddle Stroller Quilt With Ties Tutorial


Hey guys! I have a great tutorial to share with you today over on the Shannon Fabrics blog.
I've been working with Shannon Fabrics for the past couple of months, collaborating ideas for tutorials. During a brainstorm, the word 'stroller' came up and it just clicked! I knew exactly the type of project that needed to be done!

How many of you with children dealt with the constant struggle of keeping a blanket on your child while in the stroller, especially in the colder months? Whether the blanket fell on Its own, or with the help of kicking feet, I could never keep a blanket up. I even tried pulling the ends of the blanket around the stroller frame; a very temporary solution.

The great thing about my Stroller Quilt, is that it ties up!! Not only can you tie it up out the way of the wheels, but it also creates a little pocket to keep little feet warm!


With so much soft cuddle, kids love to snuggle up! My little model couldn't stop petting the fabric. Something we can all relate to, Am I right! ;)


This doesn't just have to be a stroller quilt either. It can also be used as a quick cover up for any nursing mom.

Or a play mat for a little one.


For the full tutorial, head on over to the Cuddle Corner! And, be sure to add your completed stroller quilt to the Fabric Seeds Flickr Pool. I would love to see what you make!


September 28, 2013

Supernova

I have something exciting to share with you today!
But before I get into it, I just want to thank all you who have given me support throughout my business endeavors. I greatly appreciate your kind & encouraging comments and emails. I am so very grateful to those of you who have expressed your interest and given me the push that I really needed.

Last year I posted about a baby quilt I had designed for my new niece, using the stretched star block. In recent months, there had been a considerable amount of interest for this pattern. So, I began the process of writing up the pattern, making a couple new sample quilts (that was the easy part!) and learning about what to do/where to go for printing. This has been quite the learning experience for me!
After a long search, and a little guidance from a fellow pattern writer, I was able to find a great printing company. Next, came creating a new logo. After some brainstorming with a friend of mine, we came up with a pretty good idea, at least at the time. When I got my logo, and added it to the pattern, it just didn't fit. I wasn't sure about it. Good thing I've got some pretty good quilty friends who could offer their opinion. Sorry to say, the first logo was a no-go. After a couple more brainstorming ideas, this time with my bro., he drew me up something amazing. I love how this new logo really fits with everything I wanted it to be. I am so much happier with the logo, and my quilty friends agree :)

I am so excited to introduce to you my first publicized pattern under my new design name:


I only had one thought for this pattern: Supernova. What I love most about this pattern is, that it works incredibly well with a great range of color. With the right placement of the blocks, the colors move as a gradient, which reminds me of how a Supernova looks, sending out tiny bits of star in a burst of spectacular color. 


Now I know not everyone wants to make a baby quilt. It's always good to have an option, right!? Well, the another awesome thing about this pattern is, it not only has options for Baby, Toddler, Lap and Twin; but it also has options for a larger scale block in quilt sizes Lap, Twin and Queen/King!


Seriously, I would have included the smaller scale blocks all they way up to Queen/King, but while I was looking at it, and had the math all figured out, I wondered if anyone would really want to make a King size quilt with the smaller blocks, I mean, besides me :)


And, yes! This pattern is extremely pre-cut friendly! Charm squares are great for the smaller scale (and actually the mini charms would work great as well, just be sure to have them in multiples of 4) and Layer Cakes (or any 10" squares) are perfect for the larger scale (again, charms would work for the larger scale, just remember to have 4 of each print).


In case anyone is wondering about my fabric choices, for the smaller scale quilt, I used Cuzco by Kate Spain with Bella Solid Bleached White as the background. For the larger scale quilt, I chose Pick A Bunch by Nancy Mims with RBD Gray Solid as the background.


Supernova is currently in production, with the expectation to arrive in the next couple of weeks.
This is an 8 page booklet; with full color, step-by-step illustrations, and clear coated.

As a bonus for pre-ordering, you can save $2.00 off the purchase amount by entering coupon code 'supernova' at checkout. This promo is only for pre-orders! As soon as the patterns arrive, it will be at regular price. Although I don't have an official date yet, you'll have at least through next week to pre-order. I will update once the patterns have been shipped by the printer.

I am sooo excited!!!
I hope to be able to share many more patterns with you in the future!

July 1, 2013

li'l twister quilt

I have this rug I bought for my my child's room, while preparing the nursery. Not knowing what I was having, I wanted the room to be gender neutral. the walls were painted a sea green and I found this rug that reminded me of the sea.

I love this rug.

I love it so much, I decided I wanted to have a quilt to match.


Lucky for me, I hosted a brick swap a few months ago, and the decided colors were lime green, blue and purple. Perfect! 

Plus, I have been wanting to try the lil' twister method for quite some time. I knew this quilt would be perfect for that too. I'm not gonna lie. The twister was more difficult than I anticipated. It was still worth it, mind you. But I don't think I have ever gotten such a work out from quilting!

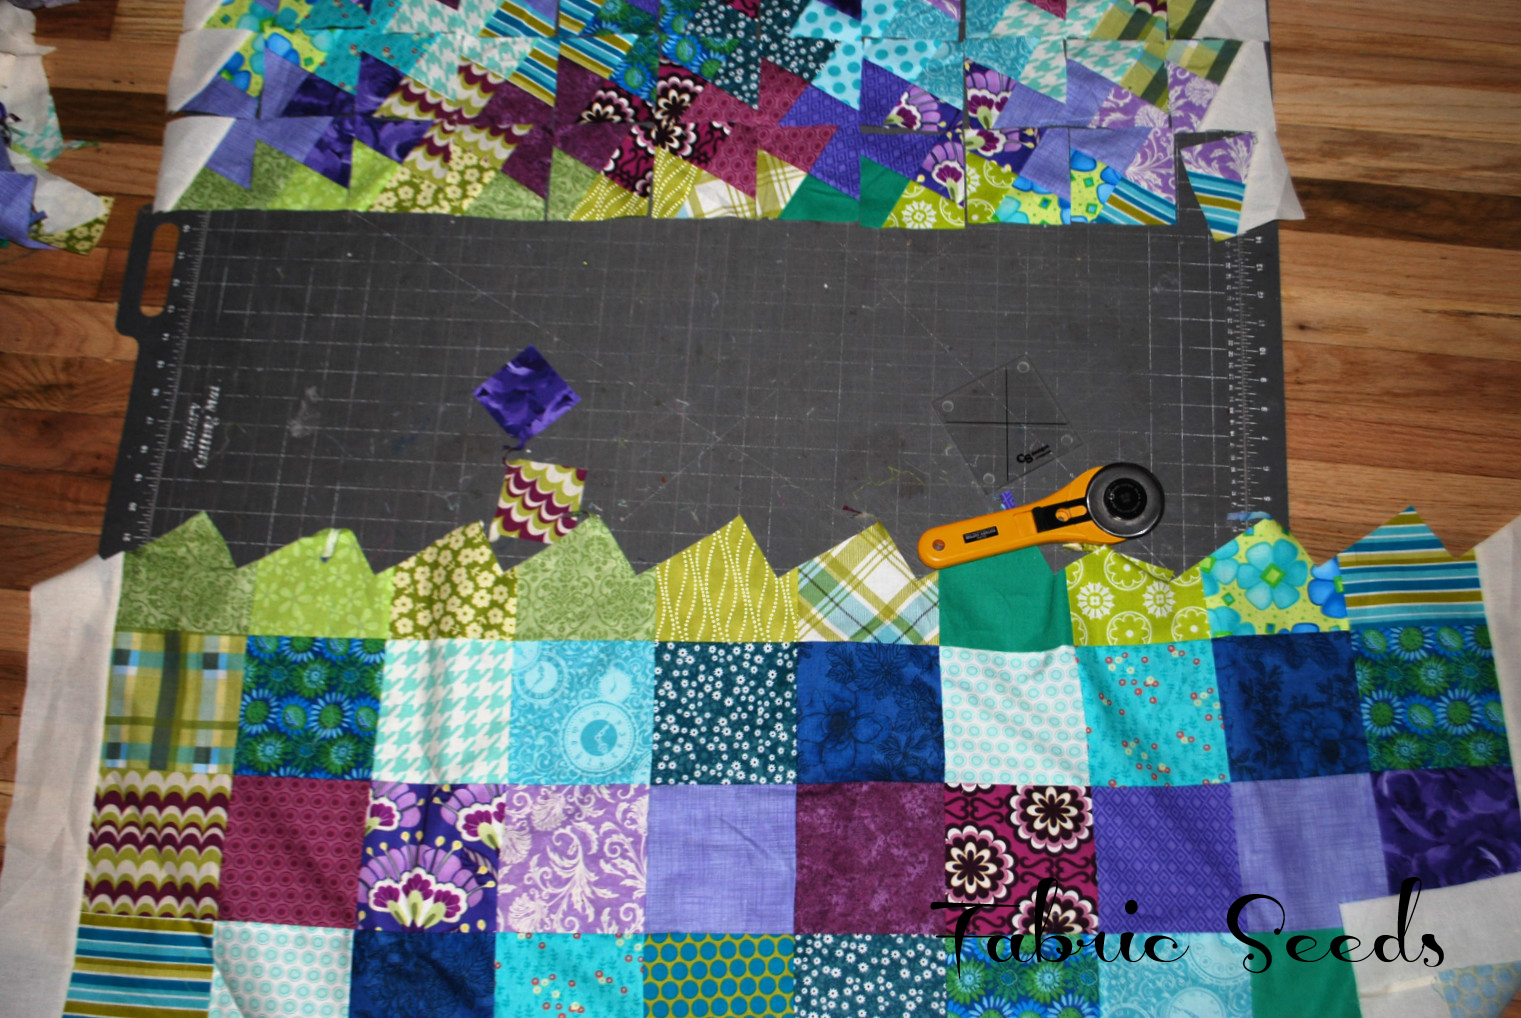
If you're not familiar with the lil' twister, it goes something like this: First, sew your blocks together patchwork style, along with the border.


Align the twister tool with the seams at the corner.


Cut around the twister tool. repeat for each corner seam. 


Set the newly cut pieces in the same order as was cut, slightly turning them to the right, so all edges are square.


Sew them back together, patchwork style.
Ta-Da!


I actually started this quilt on December 31, 2012. Hoping to get one more quilt top finish in before the end the year. Again, thinking this was easier than it actually was. I managed to get all the pieces cut and sewn back into their individual rows. It was a long day of sewing and cutting. Mostly cutting. I went to bed fairly late, and finished up in the morning. I didn't get it quilted until a few months later.

The only 'before' picture I could find was on my phone. well, a sort of before. I'm just glad I at least had one picture, somewhere. Here it is all layed out and ready to be sewn in to rows.


A few of cutting process. Now this is where I over estimated the ease. In order to cut around the template, with out wanting to move the fabric or template, I moved myself instead. Circling the template for each cut. My legs (and hands) were sore by the end. Definitely not ideal for a large quilt. And by 'large', I mean lap size.


I save all my middle pieces. Trimmed the strings. Sized them up and used them for the border.


And (dum dum DUM), here is my finished quilt! 


I quilted straight lines in the borders, using neutral thread around the twisters, and a purple/green variegated thread in the outer border. I had this brilliant idea that the lines would match, with a break in the patchwork border. I forgot to take the corners into account. So, they don't match like I had planned, but it's barely noticeable, right?!

In the corners, I quilted a giant mum. I had also planned on doing straight lines here, but I didn't like how the first corner turned out and unpicked it all. I am happy I did. I love the mum medallions.


The back is all from 1 yard cuts I had in my stash. Same with the binding.
It may have been all the purple I own. I don't know about you, but there always seems to be one color lacking in my stash. And for me, that's purple. 


If I had thought things through a little better, I would have used the purple in my little demo too.
Of course this thought hadn't dawned on me until I actually made the backing. I still like it.


I absolutely love this quilt.
I'm pretty sure I will make another twister quilt in the future.
And, have you seen all the patterns out there? So cute!