I love this rug.
I love it so much, I decided I wanted to have a quilt to match.
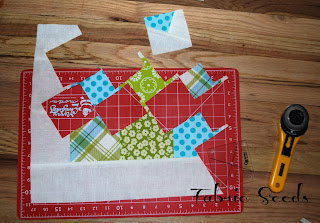
If you're not familiar with the lil' twister, it goes something like this: First, sew your blocks together patchwork style, along with the border.
Align the twister tool with the seams at the corner.
Cut around the twister tool. repeat for each corner seam.
Set the newly cut pieces in the same order as was cut, slightly turning them to the right, so all edges are square.
Sew them back together, patchwork style.
Ta-Da!
I actually started this quilt on December 31, 2012. Hoping to get one more quilt top finish in before the end the year. Again, thinking this was easier than it actually was. I managed to get all the pieces cut and sewn back into their individual rows. It was a long day of sewing and cutting. Mostly cutting. I went to bed fairly late, and finished up in the morning. I didn't get it quilted until a few months later.
The only 'before' picture I could find was on my phone. well, a sort of before. I'm just glad I at least had one picture, somewhere. Here it is all layed out and ready to be sewn in to rows.
A few of cutting process. Now this is where I over estimated the ease. In order to cut around the template, with out wanting to move the fabric or template, I moved myself instead. Circling the template for each cut. My legs (and hands) were sore by the end. Definitely not ideal for a large quilt. And by 'large', I mean lap size.
I save all my middle pieces. Trimmed the strings. Sized them up and used them for the border.
And (dum dum DUM), here is my finished quilt!
I quilted straight lines in the borders, using neutral thread around the twisters, and a purple/green variegated thread in the outer border. I had this brilliant idea that the lines would match, with a break in the patchwork border. I forgot to take the corners into account. So, they don't match like I had planned, but it's barely noticeable, right?!
In the corners, I quilted a giant mum. I had also planned on doing straight lines here, but I didn't like how the first corner turned out and unpicked it all. I am happy I did. I love the mum medallions.
The back is all from 1 yard cuts I had in my stash. Same with the binding.
It may have been all the purple I own. I don't know about you, but there always seems to be one color lacking in my stash. And for me, that's purple.
If I had thought things through a little better, I would have used the purple in my little demo too.
Of course this thought hadn't dawned on me until I actually made the backing. I still like it.
I absolutely love this quilt.
I'm pretty sure I will make another twister quilt in the future.
And, have you seen all the patterns out there? So cute!


i made a little twister quilt from my brick swap too. but i just did baby size. you can see it here: http://choochooskadoo.blogspot.com/2012/12/little-twister.html.
ReplyDeleteLove the quilting on yours! you are so talented!
I love the quilting you did on this quilt. It is amazing!! You never cease to amaze me. I can't wait for the day that I can machine quilt as good as you do. :)
ReplyDeleteI love the twister. It looks so complicated, but is so easy. Love your quilt
ReplyDeleteCan you tell me how you did your borders? I am wondering how wide you cut your borders and what size blocks you used in your checkerboard border.
ReplyDeleteHi Donna, I didn't see that you have an email to respond to, so I hope you see this :)
DeleteThe inner border was cut at 3 1/2" wide, and the outer border was cut at 5 1/2" wide. The checkerboard was just the scraps from cutting out the twisted blocks. I took the smallest one and matched the others to the same width, so some are a little longer than others, but all were about 2 1/4" wide. Let me know if there is anything else I can help you with! :)
Sarah, I love the back of this quilt and I too want to add a panel of fabric that I used to sew my Stack and Whack pattern. How did you insert your piece? I can't really see seams running down each of the 4 corners. Can you share how you did it please? Thankbyou
ReplyDeleteSarah, I love the back of this quilt and I too want to add a panel of fabric that I used to sew my Stack and Whack pattern. How did you insert your piece? I can't really see seams running down each of the 4 corners. Can you share how you did it please? Thankbyou
ReplyDeleteHi Staci, There wasn't an email to reply to, so I hope you see this. For the backing, I simply measured the width of the quilt and cut my strips about 12" longer. I quilt on my home machine, so I don't need as much extra fabric like you would need with a long-arm. For the twister block, I cut the purple strip the same size as the block, then cut again about 1/4 of the way in, sewed the strips to the sides of the block, then cut 2 strips for the top and bottom. Hope this helps! If you have any other questions, feel free to ask anytime!
DeleteThis little quilt is stunning. I bought fabric today to make one like this for my Great, Great Niece (that's on her way in a few months). Thank you so much for sharing.
ReplyDelete